In this article, you will learn what a hydrometer is, how to interpret hydrometer reading and how to use a hydrometer for brewing beer at home.
One of the mysterious pieces of equipment in a homebrewer’s tool kit is the hydrometer. This thermometer-like tool has strange markings and speaks a language many of us forgot sometime after high school. However, this tool is essential when it comes to the brewing process.
Knowing how to use a hydrometer properly is essential to helping you gauge fermentation and alcohol content. Unfortunately, our first brewing experience with the hydrometer didn’t go quite as well as we had hoped because we didn’t fully understand how to use our hydrometer correctly.
There is a technique to using your hydrometer and little details that can make a big difference in how accurately your hydrometer reads.
Before we get into how to use your hydrometer, let’s talk a bit about what a hydrometer is and what it does.
Table of Contents
What a Hydrometer Is and What It Does
A hydrometer is an instrument that measures the density or specific gravity of a liquid. If you remember back to science class, different liquids have different properties, and their weight or density is often compared with water. This comparison to water is how we know that oil is lighter than water and will float on top, while heavier liquids will.
During fermentation, the specific gravity or density of the beer compared to water changes. This change is measured using a hydrometer. When we brew, we use a hydrometer for two things:
1) to determine the efficiency of fermentation, and
2) the amount of alcohol produced during fermentation
To determine fermentation efficiency, we measure specific gravity throughout the fermentation process. Our first reading is taken just before pitching yeast into the wort. We know that fermentation is complete when the specific gravity reading no longer changes. This leveling of density indicates that the yeast had finished working.
By measuring specific gravity or density, we can calculate the percentage of alcohol by volume or ABV. ABV is a simple calculation that uses the OG (original specific gravity) and the FG (final specific gravity).
So now that you know what a hydrometer is, we can tell you about different types of hydrometers and how to use a hydrometer.
Types of Hydrometers

There are a few different types of hydrometers that you may want to consider as you are building your homebrew supply kit.
Triple Scale Hydrometer
This is the most common of the hydrometers and the easiest to use. It also tends to be the least expensive. A triple scale hydrometer measures specific gravity and has the Brix/Balling scale and a scale for potential alcohol.
The measurement range you’ll find on this type of hydrometer is 0.00-1.170, so it is a good fit for most homebrews. The disadvantage of this hydrometer is that it has lower accuracy for specific gravity. This means that your ABV calculation will not be as precise.
Precision Hydrometer
True to its name, this hydrometer measures specific gravity much more accurately, and it usually doesn’t have the other scale options. The scale on precision hydrometers is smaller, so you get a more precise reading.
For most beer styles, a precision hydrometer with a scale that measures 1.000-1.700 will be fine. But if you’re working on a bigger beer with a higher anticipated ABV and a higher OG, you may want to have to invest in a second precision hydrometer with a higher range.
Do keep in mind these hydrometers are more expensive, almost double the price of the basic triple scale hydrometer, so a better investment for the experienced and dedicated homebrewer.
Thermohydrometers
For the best accuracy in ABV, you want to factor the temperature into your calculation. A thermohydrometer will measure both temperature and specific gravity. These hydrometers do need to be accurately calibrated to work correctly and for consistency. However, they really do give a good measure of ABV. In addition, they aren’t terribly expensive, and for the price, you get a thermometer and hydrometer in one tool.
Digital Hydrometers
If you want a hydrometer that is a lot more durable, a digital hydrometer is a great option. These hydrometers are pretty simple to use, requiring that you simply insert the probe into beer or wort. They also aren’t prone to breaking like glass hydrometers. However, it is important to note that digital hydrometers should be properly calibrated before use, or your readings will be inaccurate.
How to Use a Hydrometer
Once you have settled on the specific hydrometer for your brew, it is time to learn how to use it.
Step 1: Acquire Equipment
Before you can measure specific gravity using a hydrometer, you will need to ensure that you have all the equipment you need. You will also need to make sure that all your equipment is cleaned and properly sanitized so that you don’t introduce unwanted bacteria or yeasts to your beer. The tools you will need are:
- Hydrometer
- Thief – this tube allows you to “steal” a small amount of beer from your fermenter without having to pour. It also allows you to collect beer or wort from the full depth of the fermenter.
- Glass Hydrometer Cylinder – You can use a plastic hydrometer cylinder or even your thief, but glass is better for keeping bubbles from sticking to the hydrometer and the cylinder.
- Pencil and Paper – to record your gravity readings
Step 2: Transfer Wort or Beer
Once your thief has been cleaned and sanitized, slowly sink it into your beer or wort. Allow the thief to fill with beer or wort from the complete depth of your fermenter or carboy. Next, carefully empty the thief down the side of your hydrometer cylinder. Running the beer or wort down the side reduces the number of bubbles present in the cylinder. Bubbles can make it hard to get an accurate reading.
Step 3: Float Hydrometer
Take your clean and sanitized hydrometer and insert it into the filled hydrometer cylinder. Before releasing the hydrometer, give it a quick twist, allowing the hydrometer to spin freely in the cylinder. This will dislodge any bubbles from the hydrometer allowing for a clear reading while preventing the hydrometer from touching the side of the cylinder.
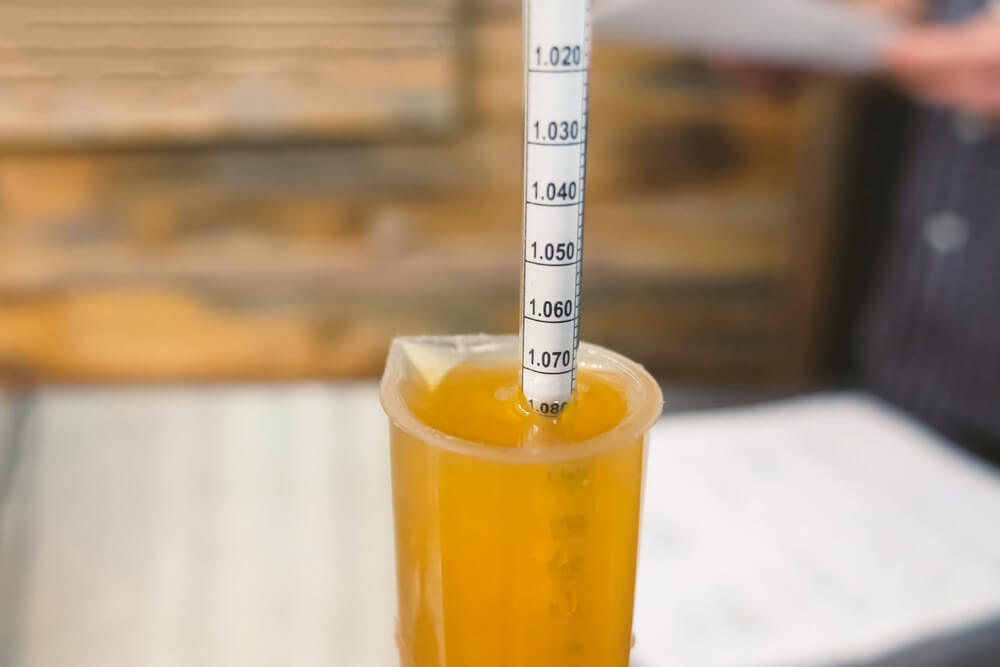
Step 4: Read Hydrometer
Look through the cylinder and determine the point on the hydrometer the beer or wort is reaching. This value is the specific gravity of the liquid. Record the value. If you are measuring your wort, make sure to keep track of this value; this will be your OG (original gravity reading), and you will need it at the end of fermentation, along with the FG (final gravity reading) to determine the ABV of your beer.